
Common Boat Grooming Errors That Put Finishes at Risk

Common boat grooming errors to avoid include using household detergents or unsuitable tools, leaving salt and cleaner residue on surfaces, and waxing before the finish is prepared. Choose marine-formulated products and tools suited to each surface, rinse thoroughly with fresh water, dry the boat, and apply wax only as the final protective step. These habits help protect gel coat, glass, vinyl and metal fittings from avoidable wear and corrosion.
It’s easy to assume a household cleaner or quick rinse will do the job. But the wrong product or technique can strip protection, leave deposits or mark a delicate finish. In Auckland, where boats are exposed to saltwater and bright sun, a careful routine helps keep your vessel in good condition.
This guide explains how to choose cleaners and tools, wash and dry exposed surfaces, care for metal fittings, and clean glass, clear plastics, upholstery and non-skid areas. It also explains why cleaning and correcting the finish must come before waxing, so your grooming routine protects rather than damages the surfaces.
Table of Contents
1. Choosing marine-grade products and suitable detailing tools
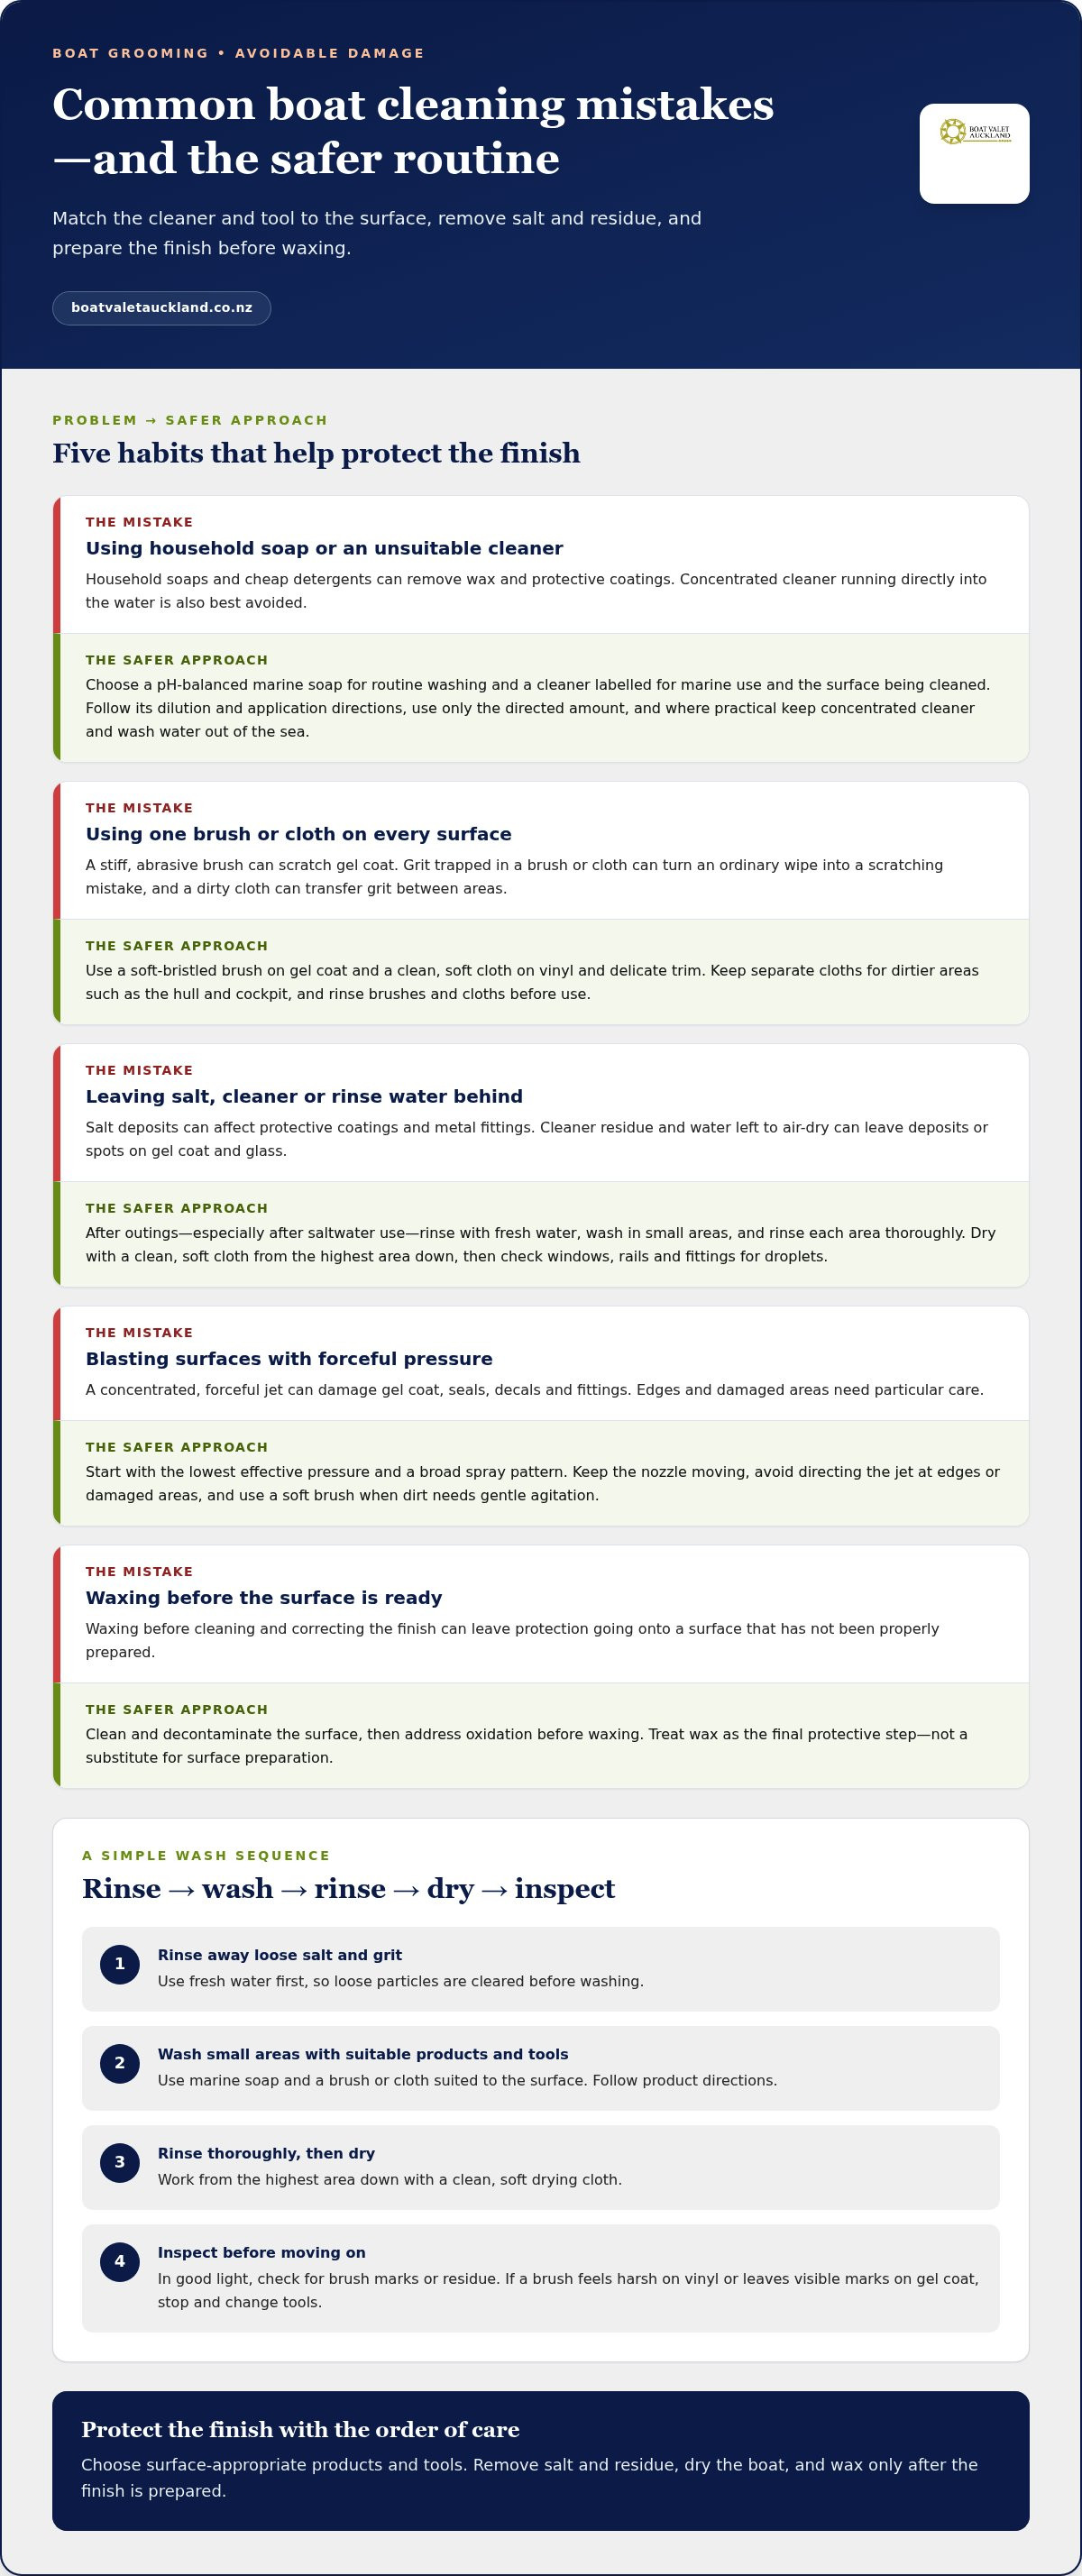
Start with a pH-balanced marine soap for routine washing. It cleans without stripping wax, while household soaps and cheap detergents can remove wax and protective coatings. Choose products formulated for saltwater exposure, then follow the label’s dilution and application directions. In New Zealand, look for a marine-use cleaner whose label describes its environmental suitability. Use only the directed amount, and avoid letting concentrated cleaner run directly into the water.
Match the tool to the surface. A soft-bristled brush is a safer choice for washing gel coat than a stiff, abrasive brush, which can scratch it. Use a clean, soft cloth on vinyl and delicate trim. Keep separate cloths for dirtier areas, such as the hull and cockpit, so grit isn’t rubbed across other surfaces. Rinse brushes and cloths before use: trapped sand can turn an ordinary wipe into a scratching mistake.
What boat cleaning products are safe for marine surfaces and the environment in New Zealand? Choose a pH-balanced product labelled for marine use and suitable for the surface you’re cleaning. Follow the label’s directions, use the recommended dilution, and, where practical, prevent concentrated cleaner and wash water from flowing directly into the sea.
Can pressure washing damage a boat, and what settings or techniques are safe? Yes. A concentrated, forceful jet can damage gel coat, seals, decals and fittings, so start with the lowest effective pressure and a broad spray pattern. Keep the nozzle moving, avoid directing the jet at edges or damaged areas, and use a soft brush instead when dirt needs gentle agitation. Professional exterior cleaners, such as specialists in pressure washing Jacksonville FL, similarly emphasise using tailored nozzle tips and lower pressures to prevent surface damage on delicate materials.
Plan marina work around conditions, not just cleaning products. Before a trip, check a marine weather forecast rather than relying on a land-based forecast. Wind and current can affect handling as you return to your berth. Prepare lines and fenders before approaching, come in slowly, and communicate clearly with anyone helping. These steps reduce the risk of contacting the dock while manoeuvring a freshly cleaned boat.
Keep the grooming process controlled: rinse loose grit away first, wash small areas with marine soap, then rinse each area thoroughly. Check the surface in good light for brush marks or residue before moving on. If a brush feels harsh on vinyl or leaves visible marks on gel coat, stop and change tools. The right cleaner and brush for each material help preserve its finish without stronger chemicals or extra force.
Marine-grade cleaning products formulated for saltwater environments are the appropriate choice for boat owners. For washing, use pH-balanced marine soap because it will not strip wax. These choices keep the cleaner aligned with saltwater use and make the soap choice clear for routine washing. Select tools with the same care: using the wrong brush can scratch a boat’s gel coat and vinyl. A brush should therefore be suited to the surface being cleaned, rather than treated as interchangeable across materials. Pairing suitable products with a suitable brush helps avoid preventable surface damage.
2. Maintaining boat finishes exposed to sun, salt and water
Sunlight, salt spray and repeated wetting all affect a boat’s exterior. Salt crystals left on the hull, rails or glass can damage protective coatings and metal fittings. Wash the boat after outings, especially after saltwater use, rather than letting deposits and grime build up. A regular routine makes each clean easier and helps stop dirt becoming embedded in the finish.
How should you wash a boat without damaging gelcoat, paint, or decals? Rinse away loose salt and grit with fresh water, then use a soft cloth or suitable brush and marine cleaner on small areas. Rinse off the solution thoroughly, taking care around decal edges, painted surfaces and worn spots, where forceful scrubbing could lift or mark the finish.
Dry the boat after rinsing instead of leaving it to air-dry. Water left on gel coat or glass can form spots and mineral deposits, dulling the surface. Use a clean, soft drying cloth and work from the highest area down, so water doesn’t run over sections you’ve already dried. Check windows, rails and fittings for droplets before putting covers on.
Set a maintenance schedule that suits how often the boat is used and its exposure. Wash it after outings, then inspect the exterior during routine upkeep. If the boat sits unused, remove fresh salt and dirt before they harden. Before winterisation or off-season storage, clean and dry accessible surfaces, and avoid trapping damp grime beneath covers.
Look for scratches, chips and worn seals during each wash. Deal with them promptly: a chip in the finish or a seal that no longer sits flush can let water and grime collect in vulnerable areas. Keep a simple record of inspection and cleaning dates. This makes it easier to spot recurring deposits or surfaces deteriorating between washes.
How often you wash matters, but safe setup matters too. When using cleaning chemicals, follow the product label, avoid mixing products, and wear the protective equipment it specifies. Keep containers secure and rinse splashes from nearby surfaces. For ladder work, place the ladder on stable ground, secure it, and keep your body centred rather than reaching sideways over the boat.
Include less visible areas in the schedule, such as the engine room, where accumulated grime can complicate routine upkeep. Engine Room Cleaning can support a broader maintenance routine, whilst regular exterior washing protects exposed finishes from salt, water spots and avoidable build-up.
3. Caring for metal fittings to prevent corrosion
Salt can collect on rails, fasteners, hinges, cleats and trailer frames. Left in place, deposits contribute to corrosion, especially where water sits around joints or damaged coatings. After boating in saltwater, rinse metal fittings and exposed trailer parts with fresh water. Pay attention to undersides, brackets and areas around bolts, where spray and grime can be missed during a quick wash.
Drying matters as much as rinsing. Water left on rails and fittings can leave spots and mineral deposits, while damp crevices keep metal wet for longer. Use a clean cloth on reachable fittings, then check seams and joins for trapped moisture. On a trailer, inspect the frame and undercarriage after rinsing. Remove dirt and salt build-up before storing it, rather than leaving deposits between outings.
What New Zealand rules apply to washing boats near waterways or using antifouling products? Avoid allowing wash water, paint scrapings or antifouling residue to enter waterways. Follow the antifouling product’s label directions, and manage removed material and wash residue carefully.
Check fittings during routine grooming, not only when rust appears. Look for discolouration, pitting, loose fasteners, damaged coatings and water around the base of a rail. Clean the affected area with a product suited to that metal, then rinse and dry it. Don’t use an abrasive pad unless it’s suitable for the fitting, since scratches can damage the surface and make future cleaning harder.
How can you prevent water spots, streaks, oxidation, and mould during boat grooming? Rinse cleaning solutions away fully, dry glass and metal fittings with a clean cloth, and watch for early oxidation. Clean interior surfaces with products suited to the material, then let them dry before closing the boat to help prevent mould and mildew.
Cabin and cockpit care also protects fittings. Damp upholstery or stored cloths can hold moisture beside metal fasteners and trim. Remove wet items after cleaning, dry seat bases and floor edges, and ventilate the interior before covering or closing it. Check beneath cushions and around dashboard fittings, where moisture can linger unseen.
Keep sailing safety separate from grooming, but don’t overlook it during general boat care. A preventer or boom brake can help prevent an accidental gybe and give the helmsman time to correct errors. Inspect these systems as part of sailing preparation, not as a substitute for rinsing, drying or checking metalwork. A clean finish and sound deck fittings both support careful boating.
For boats with antifouling, keep the work area controlled and avoid spreading residue onto fittings, trailer parts or surrounding surfaces. Follow the product label and collect paint scrapings rather than washing them away. A careful rinse, dry and inspection routine helps reveal corrosion early, before it affects a fitting’s appearance or condition.
4. Cleaning and protecting glass, clear plastics, upholstery and non-skid surfaces
Glass, clear plastics, vinyl upholstery and non-skid flooring need different cleaning approaches. A product suited to a glass windscreen may haze clear plastic or dry out vinyl. Read the cleaner’s surface instructions, use a clean cloth, and test it on a discreet area first. For non-skid, work cleaner into the texture with a soft brush, then rinse thoroughly so soap doesn’t remain in the grooves.
Clear plastics can scratch or become cloudy if cleaned with a gritty cloth or abrasive pad. Rinse away loose dirt before wiping, and use a soft, clean cloth with a product intended for clear plastic. On glass, remove cleaning residue and dry the surface to reduce streaks. Don’t drag a cloth used on gritty deck areas across a windscreen.
What mistakes should you avoid when cleaning teak, vinyl, canvas, and stainless steel? Avoid using the same harsh cleaner or abrasive tool on every material. Choose a suitable product for each surface, work gently, and rinse away residue, especially from teak grain, vinyl seams, canvas folds and stainless-steel joins.
Wax or sealant belongs at the end of preparation, not the beginning. Wash and decontaminate the surface first, then remove oxidation if present. Applying protection over dirt or oxidation can leave an uneven finish and trap contamination underneath. Once the surface is clean and prepared, wax or sealant can help protect it from UV exposure, saltwater and other environmental effects.
Interior surfaces need regular cleaning too. Seats, dashboards and floors collect grime, which can leave vinyl and plastics looking worn. Use a cleaner suited to the material, wipe away residue, and let components dry before closing or covering the boat. Drying helps limit the damp conditions that encourage mould and mildew, particularly around seat bases and floor edges.
For teak, use a suitable cleaner and avoid aggressive scrubbing that could damage the surface. On vinyl, avoid abrasive pads that may leave marks or weaken it. Clean canvas gently and let it dry before folding or covering. For stainless steel, avoid tools that scratch the surface; rinse fittings and dry them to remove salt and water marks.
Non-skid decks also need careful treatment. Don’t leave wax on walking surfaces, as it can affect grip. Apply protective products only where appropriate, and keep them off textured areas. When working beneath a boom, wear protective headgear to help reduce impact injuries if the boom strikes someone.
Use products formulated for marine use throughout the boat; household cleaners can strip protective wax or sealant and damage surfaces. Regular interior care matters because seats, dashboards and floors can accumulate grime and look worn. Clean and protect these areas with products suited to each material, and ensure components are dry before closing the boat to help prevent mould and mildew.
Before applying wax, wash and decontaminate surfaces, removing oxidation if present. Wax is the final protective step, not a substitute for preparation. Without UV protection, vinyl, paint and plastics can fade, crack and weaken over time, so use appropriate protection on exposed surfaces.
5. Preparing and decontaminating surfaces before waxing
Wax is the final protective step, not a shortcut for cleaning. Applying it over salt, grime or oxidation can seal contamination against the surface and leave an uneven finish. Start with a fresh-water rinse, then wash the gel coat with marine cleaner and a clean cloth. Rinse thoroughly before assessing the finish in good light.
Run your hand lightly over the clean, dry surface. A rough or gritty feel can indicate bonded contamination that ordinary washing hasn’t removed. Use a suitable marine surface-decontamination method, following its product directions and working on a small area at a time. Keep the cloth or applicator clean, and stop if it picks up grit that could scratch the gel coat.
Look for chalky patches or a dull appearance before waxing. These can indicate oxidation, which needs to be removed with a suitable polishing process before protection is applied. Work progressively and inspect each area as you go, rather than applying more product over a patch that hasn’t changed. Once the surface is clean, smooth and dry, apply wax or sealant according to its instructions. Keep it off non-skid areas, where residue can affect grip.
Don’t rush the final preparation. Check around fittings, decals and windows for leftover cleaner, polish or water. Use a clean microfibre cloth to remove residue, and replace it when soiled. Apply protection in manageable sections so you can spread it evenly and remove excess as directed. Wax helps protect prepared surfaces from UV exposure, saltwater and other environmental factors; it cannot replace cleaning or surface correction.
Preparing a boat for trailering also calls for a separate check. Secure loose gear, close hatches and ensure the boat is correctly supported before travel. If the trailer allows it, lower the engine for trailering; otherwise, use a transom saver bracket to support and secure the outboard. These checks protect equipment and reduce movement during transport.
Docking preparation has its own sequence. Before the final approach, prepare lines and fenders, communicate with anyone assisting, and approach slowly. Check drift and use rudder or throttle to turn the bow into the wind or current, reducing speed as you come alongside. Keep the manoeuvre controlled rather than relying on a last-second correction.
Waxing over oxidation, leaving polish in a fitting’s edge or applying protection to a dirty surface can undermine the finish. Give preparation the same care as application. For help restoring a tired exterior finish, arrange professional boat finish care.
Boat Valet Auckland: Boat Cut and Polish
Boat Valet Auckland provides Boat Cut and Polish for owners whose gel coat looks dull or shows oxidation beyond what routine washing can address. It’s a practical next step when cleaning and careful preparation no longer restore the finish you want. The service treats the exterior surface and helps prepare it for protection such as wax or sealant.
Consider Antifouling for hull maintenance, Teak Restoration for weathered teak, or Interior Valet for worn or soiled cabin and cockpit surfaces. Match the service to the area needing attention rather than using one grooming method across different materials.
For help with your boat’s finish, contact Boat Valet Auckland.
Make your next maintenance session count
Keep common boat grooming errors to avoid in mind as you plan your next maintenance session. Let the condition of each surface guide your approach: a tired exterior finish needs different care from weathered teak or a hull requiring antifouling. Choosing the right next step helps focus your effort where the boat needs attention, rather than adding products without a clear purpose.
Boat Valet Auckland offers Boat Cut and Polish, Antifouling and Teak Restoration for these distinct maintenance needs. If the finish needs more than routine grooming, or you’d prefer a specialist to handle the work, explore the option that fits your boat. Contact Boat Valet Auckland today to discuss the right care for your vessel. A thoughtful next step can help you enjoy a boat that’s ready for the water and looking its best.
Frequently Asked Questions
What are the most common boat grooming and detailing mistakes?
Common boat grooming errors to avoid include using one tool or cleaner across incompatible surfaces, overlooking hidden edges, and applying protection before the finish is ready. For example, a cloth used around a gritty cleat can carry particles onto a clear screen. After grooming, inspect beneath hinges, around fittings and along window seals. These tucked-away areas can reveal missed residue or grime before it becomes harder to remove.
Comments