
Spring Boat Grooming Checklist for Summer-Ready Boating

A boat can look summer-ready while still hiding a faulty pump or worn hose connection. A spring boat grooming checklist should cover safety gear, the hull and deck, the interior, the engine and plumbing. Clean the bilge and test its pump, then run onboard systems during a short shakedown before your first full outing.
It’s easy to focus on visible jobs such as washing the deck, polishing the hull and freshening the cabin. Those matter, but spring preparation also means checking that essential equipment works and water systems are ready to use. A methodical inspection helps you spot maintenance needs while there’s still time to address them.
This guide takes you through what to inspect, clean and prepare, with particular attention to plumbing and water pumps. You’ll also find practical checks for safety equipment, the hull, interior surfaces and engine systems, arranged to help you work through the jobs clearly and prepare for summer.
Table of Contents
Cleaning and organising boat interiors and gear
Start inside by removing loose gear, opening lockers and checking for damp, odours or mould. Clean surfaces with a product suited to the material, then dry them fully before replacing items. For mildew and stains, use a marine-safe cleaner, work gently and test a hidden area first. Treat gelcoat oxidation separately with a suitable polish, following the directions to protect the finish.
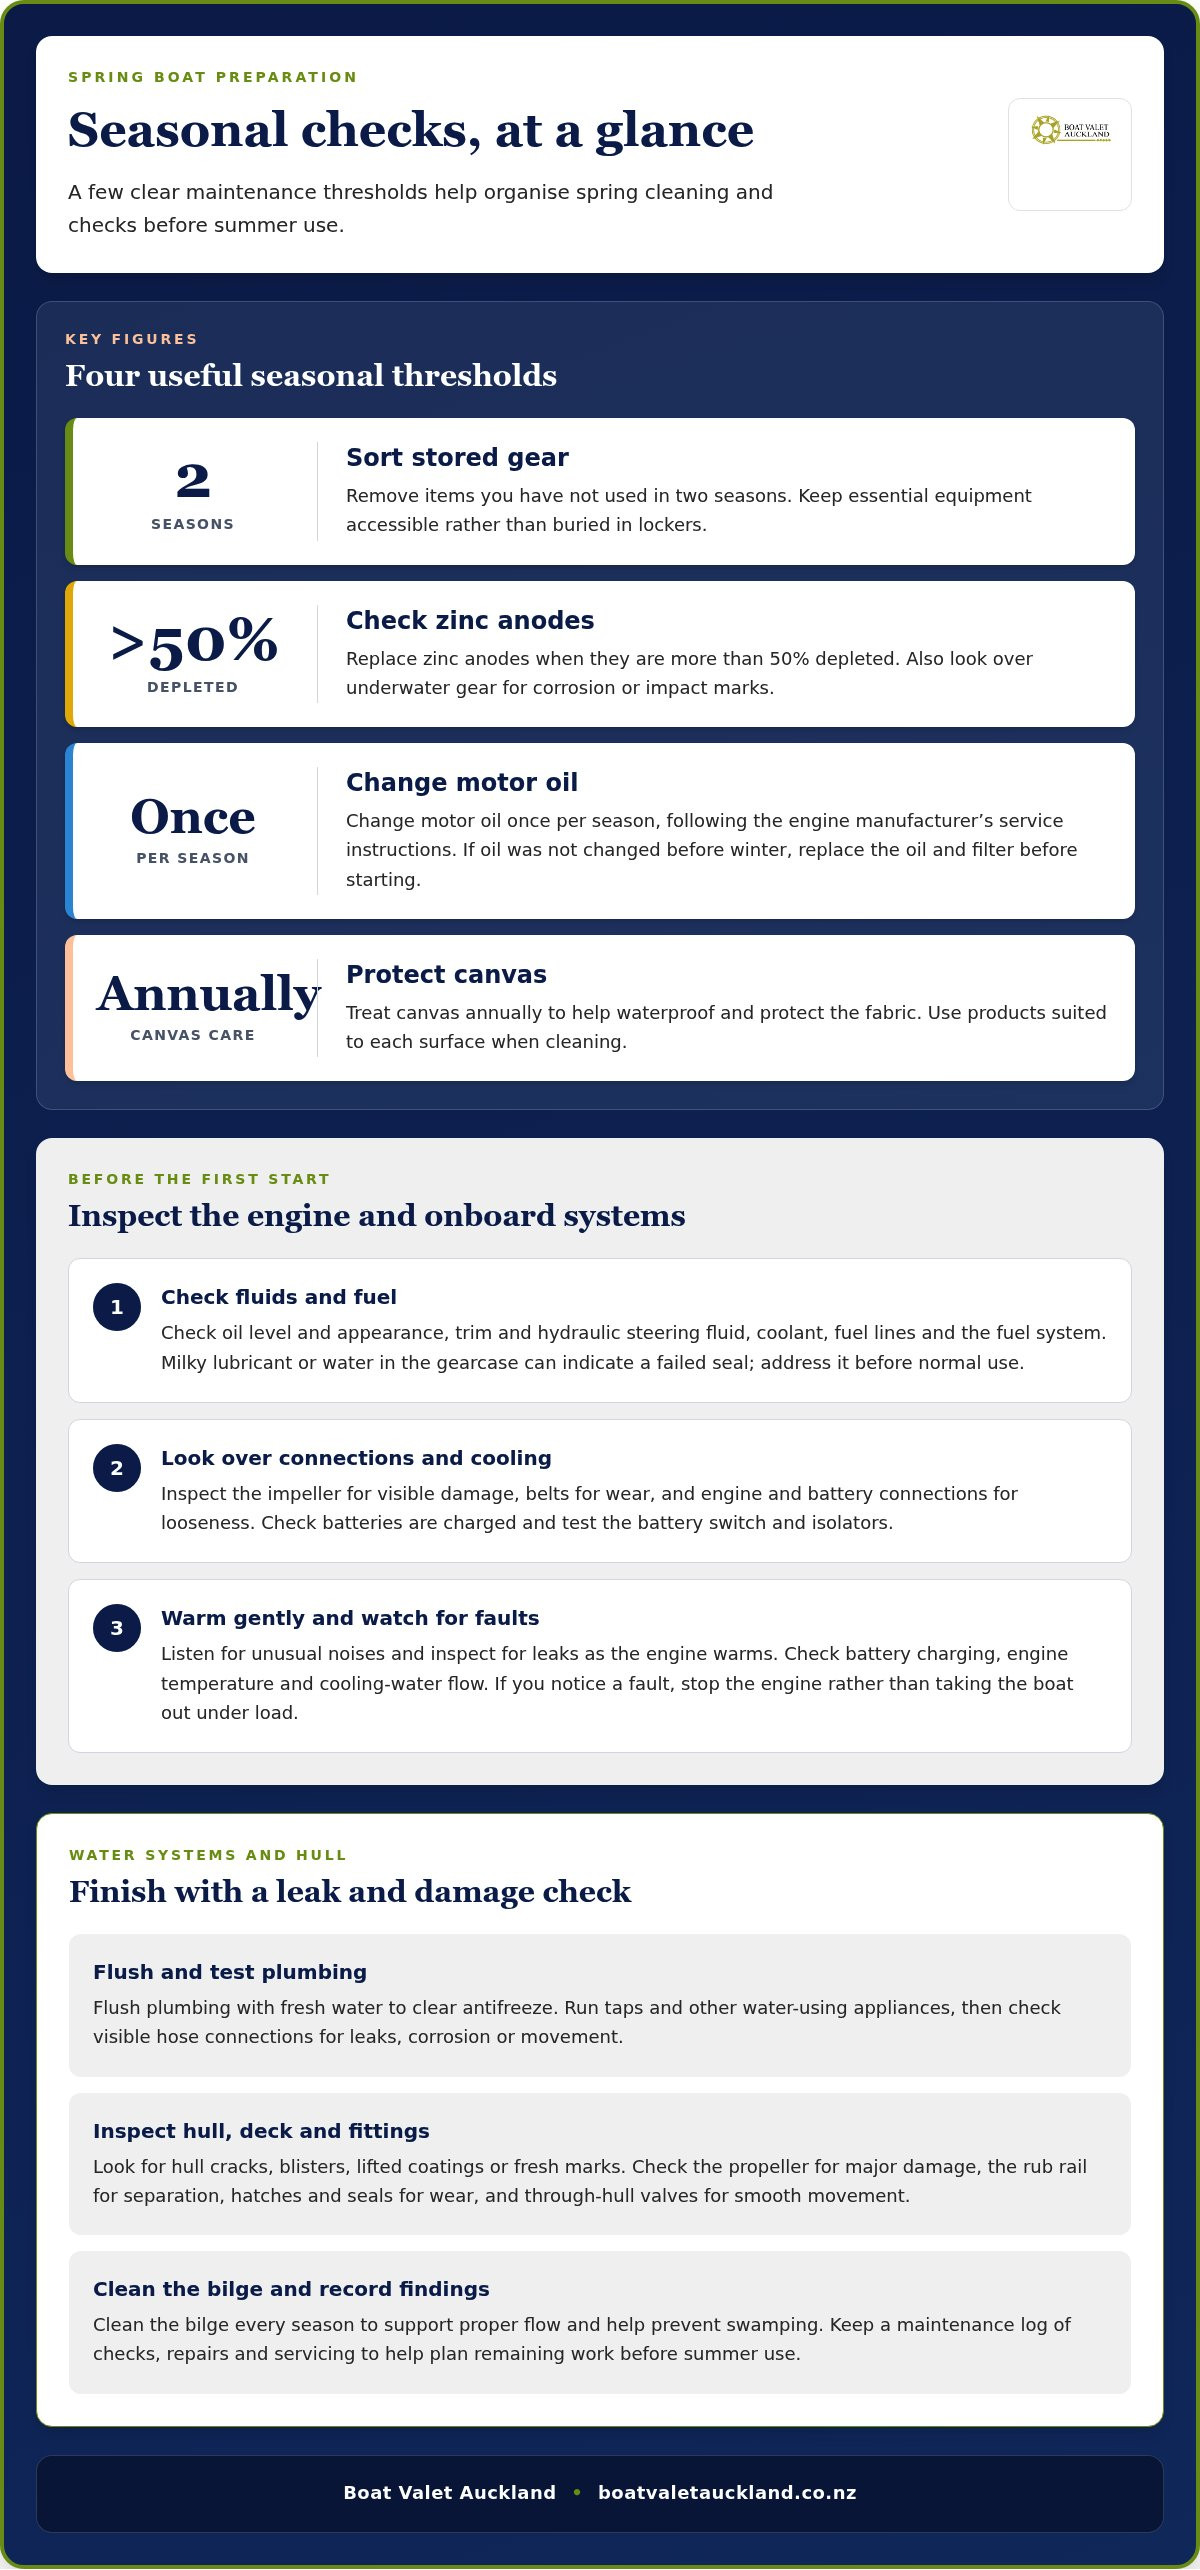
Sort stored equipment as you clean. Remove items you haven’t used in two seasons, and keep essential gear accessible rather than buried in lockers. Check fire extinguishers, distress signals and first-aid supplies for expiry or damage. Inspect life jackets for torn fabric or waterlogged foam, and make sure there are enough for everyone aboard. Test a handheld safety device, such as a torch, and replace its batteries if needed.
On deck, wash away grime before inspecting upholstery, canvas and fittings. As part of spring preparation, apply UV protectant to vinyl and plastic surfaces. Treat canvas annually to help waterproof and protect the fabric. Clean fishing rods, reels and tackle, then check lines for wear and hooks for corrosion. Secure sharp or loose gear so it can’t slide across the deck underway.
Use the spring clean to look below the waterline, especially if the boat has been stored ashore. Check the hull for blisters, damaged antifouling and other visible damage. Inspect underwater gear for corrosion or impact marks, and examine anodes for depletion. Replace zinc anodes when they are more than 50% depleted. Damaged antifouling may need attention before launch; the right preparation depends on the coating’s condition and the hull surface.
Inspect the propeller for major dings or damage before the boating season.
Check the rub rail for separation and loose fasteners.
Look over hatches and seals, replacing worn gaskets.
Operate through-hull valves to ensure they move smoothly.
Clean the bilge every season to support proper flow and help prevent swamping.
Finish by cleaning around seacocks and hose connections, then check for leaks, corrosion or movement. If the boat is ashore, inspect the rudder for play or vibration in its shaft, tube or shoe, and look for stress cracks around the rudderstock. Record your findings in a simple maintenance log. A clear record helps you prioritise repairs and plan antifouling before summer use.
De-winterizing the engine and onboard systems
Before starting the engine after winter storage, check what was completed during winterisation. If the oil wasn’t changed beforehand, replace the oil and filter before starting. Change motor oil once per season, following the engine manufacturer’s service instructions. For a four-stroke outboard, trim the engine straight up and down before checking the dipstick. This position gives you an accurate oil reading.
Check the oil’s appearance as well as its level. Milky lubricant or water in the gearcase can indicate a failed seal and needs attention before normal use. Check trim and hydraulic steering fluid reservoirs, topping them up with the specified fluid if needed. Look over fuel lines for cracks or brittleness. Inspect the fuel system and replace fuel filters and water separators with parts suited to the engine.
Fuel left in the boat during storage also needs attention. If stabiliser wasn’t added before winter, degraded fuel may need draining and replacement; another option is to add fresh fuel and stabiliser. Check the fuel system for leaks before starting. Inspect the engine impeller, even if it appeared serviceable during autumn checks. Its condition affects cooling, so address visible damage rather than assuming it will last another season.
Check that the coolant is clean; discolouration or sediment in the reservoir calls for a change using the manufacturer’s recommended type.
Inspect belts for wear, and look for loose connections around the engine and battery.
Confirm batteries stored over winter are charged before use if they weren’t charged during storage.
Test the battery switch and isolators, then check that the battery charges after starting.
Once the pre-start checks are complete, start the engine and let it warm gently at the dock if it hasn’t run for a while. Listen for unusual noises and inspect for leaks as it warms. Check that the battery is charging, and monitor the engine temperature and cooling-water flow. If you notice a fault, stop the engine rather than taking the boat out under load.
Flush plumbing systems with fresh water to clear antifreeze left from winterisation. Run the freshwater taps and other water-using appliances, then check visible connections for leaks. Record maintenance, including oil changes, filters and any faults found. This gives you a clear reference for future seasonal servicing and helps prevent overlooked jobs from carrying into the boating season.
Engine compartment grime can make leaks and damaged connections harder to spot. A careful clean helps keep the area easier to inspect. For a thorough engine room clean, include it in your seasonal preparation.
Initial hull, deck and through-hull inspection
Inspect the hull in good light, working from the waterline towards the bow. Weather, impacts and time ashore can leave damage hidden beneath grime. Clean suspect areas, then look for cracks, blisters, lifted coatings or fresh marks. Record each finding with its location, such as “port quarter” or “under the keel”. These notes help you track changes and plan repairs before launch.
On deck, check hardware for movement, corrosion and damaged fasteners. Examine the rub rail for separation, and press gently around fittings to reveal looseness. Inspect hatches and seals for gaps or worn gaskets. Look for water marks around windows and deck joints; spray areas that have leaked before, such as portlights, to reveal new drips. Make sure lockers close properly and deck fittings are secure.
Clean battery terminals and cases, then inspect for corrosion, cracks or loose connections.
Test batteries every spring, and check that the battery switch and isolators operate correctly.
Inspect standing rigging for cracked or frayed wire, bent fittings, corrosion and missing cotter pins.
Replace running rigging that is chafed, frayed or showing UV damage.
Rigging checks need close attention at attachment points, not just along visible wire or rope. Follow each shroud and stay to its fittings, looking for movement or deformation. Check halyards and sheets where they pass through blocks and around winches. Chafing often appears at these contact points first. If a fitting looks bent or a pin is missing, note its location and address it before sailing.
Before the boating season, inspect the propeller for significant dents or damage. If you remove it, check the shaft for fishing line and debris before refitting. Grease the shaft, keeping grease off its threads. Turn the propeller by hand and note any unusual resistance or movement. Damage or vibration can affect operation, so don’t dismiss a visibly damaged blade as cosmetic.
Check every through-hull valve for smooth movement and visible corrosion. If the boat is out of the water, close nonessential through-hulls before launch. Before the season’s shakedown run, open the engine intake through-hull and clean its strainer. Check hose connections for movement, cracking or leaks. A final walk-around from bow to stern helps ensure you’ve inspected the hull, deck hardware, rigging and underwater openings systematically.
Replace worn hatch gaskets, and during spring commissioning check the rub rail for separation or loose fasteners. Inspect, clean and test batteries every spring.
Plumbing and water pump checks
Start with the bilge, where leaks and debris can collect unseen. Remove loose dirt, oil residue and standing water, then inspect hoses, clamps and pump wiring. Add water to the bilge and confirm the pump activates and discharges properly. Test each float switch and manual control, then check the outlet for a steady flow. A pump that won’t start, cycles repeatedly or discharges weakly needs attention before the boat is used.
Next, flush winterised water lines with fresh water until it runs clear. Fill the freshwater tank, open each tap and run water-using appliances. Drain the tank and repeat until the water runs clear and smells and tastes clean. This clears winter antifreeze from the system. Watch the fittings while water flows; damp patches beneath sinks or around a pump can indicate a leak.
Inspect below-waterline hose connections and check that each has two clamps in good condition.
Run freshwater taps individually and watch for leaks, weak flow or unusual pump cycling.
Test livewell pumps and recirculation systems, confirming water moves through each outlet.
Check the bilge pump discharge for obstructions that could restrict the flow.
Pay close attention to hose condition around seacocks, strainers and pumps. Look for cracking, softness, bulges, corrosion or loose connections. Gently move accessible hoses to check whether fittings shift. Confirm each seacock operates smoothly, and make sure the intake strainer is clean before the season’s shakedown run. A clear intake and sound hose connections help prevent restricted water flow while systems are operating.
Water pumps need regular attention, not just a spring test. Service a boat’s water pump every two months or after 200 boating hours, whichever comes first. Check for leaks, unusual noise and changes in flow during operation. Follow the pump maker’s maintenance instructions for cleaning and wear checks, as impeller condition and service steps vary by pump design.
Finish by testing the complete system under normal use. Run taps, flush toilets and operate livewell equipment, checking each outlet and connection as you go. If a pump stops, isolate its switch before inspecting wiring or the impeller. Confirm the battery is charged before relying on electrically powered pumps. Record faults and repairs, including the pump affected and any leaking connection, so the next inspection has a clear starting point.
What products are safe for cleaning fiberglass, gelcoat, teak, and marine vinyl?
Choose cleaning products according to the surface, not convenience. Fibreglass, gelcoat, teak and marine vinyl respond differently to cleaners and abrasion. Read the product label and your boat or material manufacturer’s care instructions before applying anything. Test a small, hidden area first, checking for colour change, dulling or residue. Use soft cloths or brushes and rinse thoroughly so loosened grime doesn’t dry back onto the surface.
For fibreglass and gelcoat, begin with a mild marine cleaner and water. A soft sponge can lift salt, dirt and general marks without harsh scrubbing. If gelcoat looks chalky, washing alone won’t remove the oxidation. Use a polish designed for gelcoat, following its directions and working on a small area at a time. Keep abrasive compounds away from fittings and adjacent materials. Once the surface is clean and dry, apply a compatible protective wax if the product instructions allow it.
Teak needs a different approach. Brush along the grain with a cleaner labelled for teak, rather than a general-purpose deck product. Avoid aggressive scrubbing across the grain, which can roughen the surface and create uneven colour. Rinse away the cleaner as directed, then let the timber dry before applying any treatment. For weathered or stained teak, follow the treatment maker’s sequence; sanding or harsh chemicals can remove sound wood.
For marine vinyl, use a cleaner labelled as suitable for vinyl upholstery, or start with mild soap and water. Work gently with a soft cloth, paying attention to seams where dirt collects. Rinse off the soap and dry the surface before applying a compatible vinyl protectant. Avoid solvent-based cleaners, abrasive pads and household bleach unless the vinyl maker specifically approves them. These can affect the surface, stitching or colour.
Keep separate cloths for gelcoat, teak and upholstery to prevent polish or grit transferring.
Follow dilution and rinse directions on each cleaner’s label.
Don’t mix cleaning products; combinations can damage finishes or create hazardous fumes.
Store products upright and secured, away from food and soft furnishings.
Match the tool to the mark. A soft brush suits textured non-slip surfaces, whilst a microfibre cloth works well on smooth vinyl. For stubborn gelcoat oxidation, use the appropriate polish instead of applying more pressure with a rough pad. If a test patch changes colour or texture, stop and reassess the product before treating the whole panel.
For stubborn grime in the engine space, arrange an engine room clean as part of your seasonal preparation.
Boat Valet Auckland: Boat Cut and Polish
Boat Valet Auckland offers Boat Cut and Polish for owners preparing a tired or dull exterior for summer. It’s a practical next step when washing hasn’t lifted oxidation or restored the finish, and you’d prefer a specialist to prepare the surface. The service fits naturally into seasonal grooming, after you’ve inspected the hull and identified the areas needing attention.
For other visible maintenance needs, Boat Valet Auckland also offers Antifouling, Teak Restoration and Interior Valet. Choose the service that matches the job: hull protection, weathered teak or a cabin needing a thorough clean. These services complement your own checks, but don’t replace engine, safety or plumbing inspections.
If your boat needs a professional finish before summer, contact Boat Valet Auckland to discuss Boat Cut and Polish.
Set your boat up for the season ahead
Use your spring boat grooming checklist as a working plan, not just a one-off clean. Note jobs that need attention, keep maintenance records together and schedule surface work before summer outings fill the calendar. That way, you can focus on enjoying time afloat rather than catching up on avoidable grooming tasks.
For a tired exterior, Boat Valet Auckland offers Boat Cut and Polish. Antifouling suits hulls that need renewed underwater protection, whilst Teak Restoration can refresh weathered timber. Choose the work that fits your boat’s condition and the finish you want for the season ahead.
Make the next step straightforward. Contact Boat Valet Auckland to discuss the grooming work you have in mind, then get your boat ready for a summer of confident, comfortable outings.
Frequently Asked Questions
What should be included in a spring boat grooming checklist?
A spring boat grooming checklist should cover the areas that affect safe, reliable use and your boat’s condition. Include safety equipment, cabin and deck cleaning, engine and battery checks, hull and through-hull inspection, and plumbing tests. Make a separate note for each fault, such as a stiff seacock or damaged life jacket. This makes it easier to prioritise repairs and record completed maintenance.
How do you clean and polish a boat hull after winter storage?
Wash the hull to remove salt, dirt and loose residue, then inspect it in good light. For chalky gelcoat, use a suitable polish and follow the product directions on a small test area. Work in manageable sections with a clean, soft applicator. Rinse or wipe away residue as directed. If you find blisters, cracks or damaged antifouling, record their positions before polishing or coating.
How do you clean boat upholstery, carpets, and canvas covers?
Vacuum carpets and upholstery before applying cleaner, so grit doesn’t scratch surfaces or spread during cleaning. Use a product suited to the material, testing a hidden patch first. Clean marine vinyl gently with a soft cloth, paying attention to seams. For canvas, brush off loose dirt and follow its care instructions; annual treatment helps waterproof and protect the fabric. Let each item dry fully before storing it in a locker.
How do you inspect and clean a boat’s bilge, drains, and ventilation before spring?
Remove debris from the bilge, then clean away residue so you can see surfaces and fittings clearly. Add water to test whether bilge pumps activate and discharge properly. Clear drains of leaves or dirt, then check that water flows freely. Open lockers and compartments to air them, and look for damp patches or musty smells that could indicate trapped moisture or a leak.
What antifouling paint and hull maintenance does a boat need before the boating season in New Zealand?
Choose antifouling compatible with the existing coating and the boat’s hull material, then follow the paint maker’s preparation and application instructions. Inspect the hull for blisters, impact damage and areas where coating has lifted. Check anodes too, replacing zinc anodes when they are more than 50% depleted. In Auckland, a professional assessment can help match preparation and antifouling work to the hull’s condition.
What boat grooming and maintenance should be completed before launching in spring?
Before launch, close nonessential through-hulls if the boat is out of the water, then confirm the valves operate smoothly. Make sure the engine intake is open and its strainer clean before the shakedown run. Confirm safety equipment is usable, batteries are ready, and plumbing and pumps work. Once afloat, check for leaks and test onboard systems during a controlled shakedown before taking passengers on a longer trip.
Comments